Nip2: Digital Framing
Introduction
This tutorial will cover the process of using the digital framing nip2 functions beginning with the preparation of the images before going onto described the digital framing functions themselves.
Image Preparation
In order for the images of frames and paintings to be correctly processed by the nip2 framing functions they need to be prepared. Once a frame image has been prepared it can be stored and used again against any other painting, normally without any additional preparation.
Preparing Frame Images
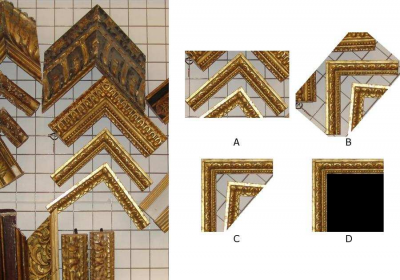
Some of the basic steps of the preparation process for frame images can be seen in see <xr id="fig:framecorners"/>.
- Load the image into a new column, for example, as object A1.
- Crop the image to remove the excess areas around the frame or frame section, which will produce object A2, <xr id="fig:framecorners"/> A.
- Use the rotation functions, to correct the orientation of or the image may have been taken at a slight angle. Either the frame, which will produce object A3, <xr id="fig:framecorners"/> B.
- Crop the image again to remove the excess areas around the frame or frame section, which will produce object A4, <xr id="fig:framecorners"/> C.
- In the column command line, type in: A5 + 1 and hit [Return], which will produce object A6. This process is going to use black or zero value pixels to define areas in the image, adding 1 to your images ensure that there are no original zero pixels in the image.
- Adding 1 to the image changes the image number format, change it back to 8-bit using: [Main Window][Toolkits: Image: Format: 8-bit unsigned], which will produce A7.
- Open up image A7 in an image viewer and use the painting tools, to colour the internal area of the frame black, <xr id="fig:framecorners"/> D.
<figure id="fig:framecorners">

</figure>
Perspective Distortion Correction
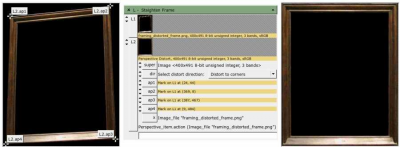
The perspective distortion correction function can be used to straighten up a frame. Real frames may not be quite straight, way the frame needs to be straightened to ensure a better result from the framing functions.
<figure id="fig:perspective">

</figure>
Preparing Painting Images
- Load the image into a new column, for example as object B1.
- Use the rotation functions, to correct the orientation of the painting, which will produce object B2, normally rotate it so that the bottom edge is straight.
- Crop the image to remove the excess areas around the painting, which will produce object B3. Do not worry if the painting is not quite straight, most are not, just crop off as much of the image you can without loosing any part of the painting.
- Select the image of the prepared frame and then use the function: [Main Window][Toolkits: Tasks: Picture Frame: Straighten Frame], see <xr id="fig:perspective"/>.
- This function places four marks on the selected image and then distorts the image so that the positions indicated by the marks are now in the corners.
- Open your original image and then position the four marks so that they are over the four corners of the frame. As the marks are repositioned the image of the corrected frame will be updated to reflect the changes. If this process does not produce a satisfactory image it may be necessary to get a better original image of the frame.
Setting Relative Resolution
In order to correctly compare a frame with a painting they both need to be the same relative resolution. The relative resolution is a measurement of how many pixels, in the image, represent a fixed distance on the original object. Relative resolutions of 10, 15 or 20 pixels per cm have provided good results. The scale value required to correct the size of your image can be calculated as follows:
- scale value = ((relative resolution) x (object width in cm))/(image width in pixels)
- Therefore if your image is 2500 pixels wide, the original object is 45 cm wide and you want to create a 20 pixels per original cm image the scale value would be: (20 x 45)/2500 = 0.32.
- Your image can then be resized using the function: [Main Window][Toolkits: Image: Transform: Resize: Scale] and change the two scale factors to equal your calculated scale value, in this case 0.32.
Saving the Prepared Images
Once all of the images preparation has been completed the images can be saved on to your computer. It is recommended that you save all frames as png files as they provide a good degree of compression without blurring the edges of the central section you have coloured black.
Applying the Framing Function
There are three different functions for building digital frames included in nip2.
- Select the frame image then the painting image and then run the appropriate function, see <xr id="fig:example1"/>.
- [Main Window][Toolkits: Tasks: Picture Frame: Build Frame: Frame Corner]
- The Frame Corner function will try to construct a complete rectangular frame from a image of the top left hand corner of a frame.
- [Main Window][Toolkits: Tasks: Picture Frame: Build Frame: Simple Frame]
- The Simple Frame function will try to construct a complete rectangular frame from the image of an existing rectangular frame, this allows the separate edges of the frame to appear different from each other.
- [Main Window][Toolkits: Tasks: Picture Frame: Build Frame: Complex Frame]
- The Complex Frame function works in a similar way to the Simple Frame function, however it allows for the retention of a central section in the middle of each of the edges.
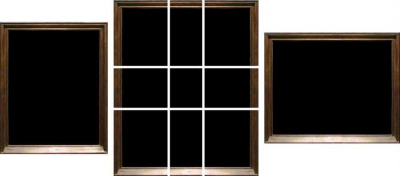
- Each of the functions crop small sections of the original frame image and automatically reassemble them to create a new frame, see <xr id="fig:frametransformation"/>.
Customising the Automatically Generated Frames
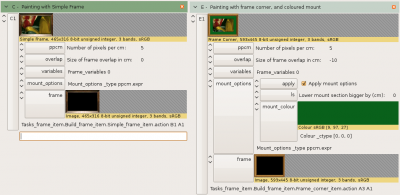
When run each of the frame building functions will produce a new complex object similar to object C3 in <xr id="fig:nipcolumn"/>. By default this object contains two variables, ppcm and overlap that a user can adjust to alter the appearance of the frame. The variables and mount options objects can be opened up to display further variables and options, see object E1 in <xr id="fig:nipcolumn"/>. The different functions contain different options but a complete list of the available options with explanations is given below.
- ppcm: This value should be changed to represent the actual relative resolution that was used to create the original images, in pixels per cm, see above.
- overlap: This defines the size of the frame rebate in cm, this value is applied based on the relative resolution set in ppcm. Negative values for overlap, see object E1 in <xr id="fig:nipcolumn"/>, result in a mount being applied around the painting.
<figure id="fig:example1">

</figure> <figure id="fig:frametransformation">

</figure> <figure id="fig:nipcolumn">

</figure>
General Options
- variables
- scale factor: This variable controls the thickness of the frame section. The default value is 1, a value of 2 would make the frame twice as thick and a value of 0.5 would make the frame half as thick.
- corner section: This option defines the size of the section used to define the corners.
- edge section: Only for the complex frame function, this option defines the size of the section used to create the edges of the frame.
- middle section: This option defines the size of the section general used to create the edges of the frame. However in the complex function this option defines the size of central section that needs to be retained.
- blend fraction: The frames are constructed by cropping small sections of the frame, duplicating them and them blending them together. This variable controls the fraction of the overlap between each of the little pieces.
- option: By default this option tells the function to just to use the left hand sections to make the left half of the frame and then produce a mirror version of it for the right hand side. If deselected the function will use all of the sections to create the complete frame. This option is not available in the corner frame functions.
- mount_options
- apply: This option tells the function if it needs to apply the other mount options.
- ls: This option allows the user to increase the size of the lower section relative to the others. The value needs to be given in cm relative to the original size of the painting.
- mount colour: This option allows the user to define the colour of the mount. Double click on the colour to open up a separate window which will allow you to select a colour.
- frame: This separate image of the frame can be saved separately if required.
Example Workspace
An example workspace, demonstrating these framing related functions, has been included within the standard Nip2 package.
- [Main Window][File: Open Examples]
- inside the framing folder, open the workspace framing.ws